
How to Stay Safe While Instagramming
Instagram provides an easy way to share filtered snapshots of life’s highlights, but like anything on the internet, it has attracted its share of bad actors. Online harassers, hackers, and scammers run rampant, but don’t let that scare you away from the Facebook-owned social network.
Instagram has introduced a number of features intended to secure your account. They range from two-factor authentication to restricting who can access your account or send you messages. And there are things you can do from your end as a user too. Here’s how to make your Instagram account safer.
Step 1. Enable Two-Factor Authentication
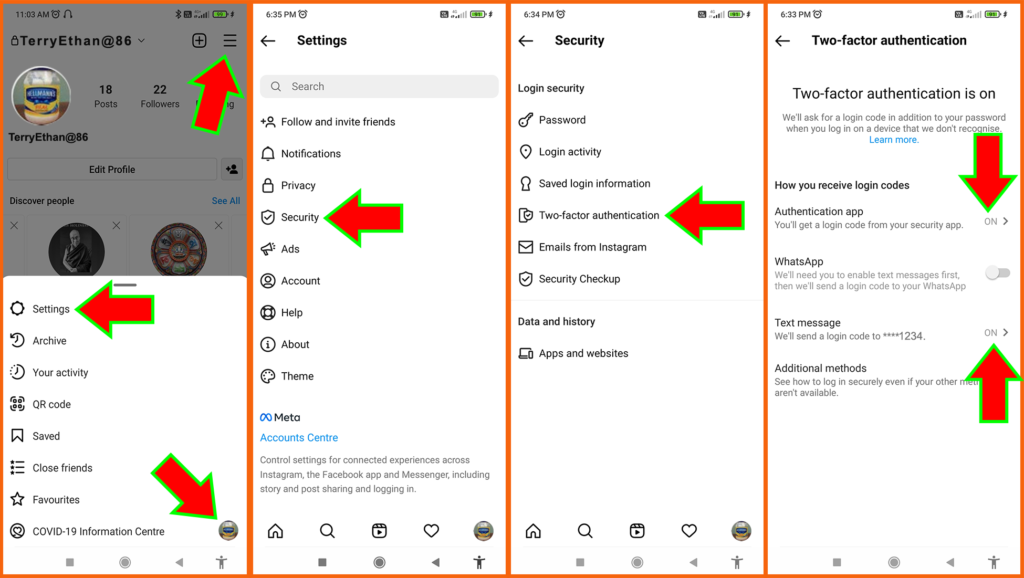
If you’re worried that someone will log in to your Instagram account and pose as you? Set up the two-factor authentication (2FA). By requiring a second form of authentication after you enter your password, a hacker can’t access your account without physical access to your connected device, even if they have your password.
To set it up, navigate to your Profile Page and tap the 3 line icon () >Settings >Security > Two-Factor Authentication > You can then choose to set up 2FA through text message or an independent authentication app, such as Google Authenticator.
Step 2. Don’t Get Phished
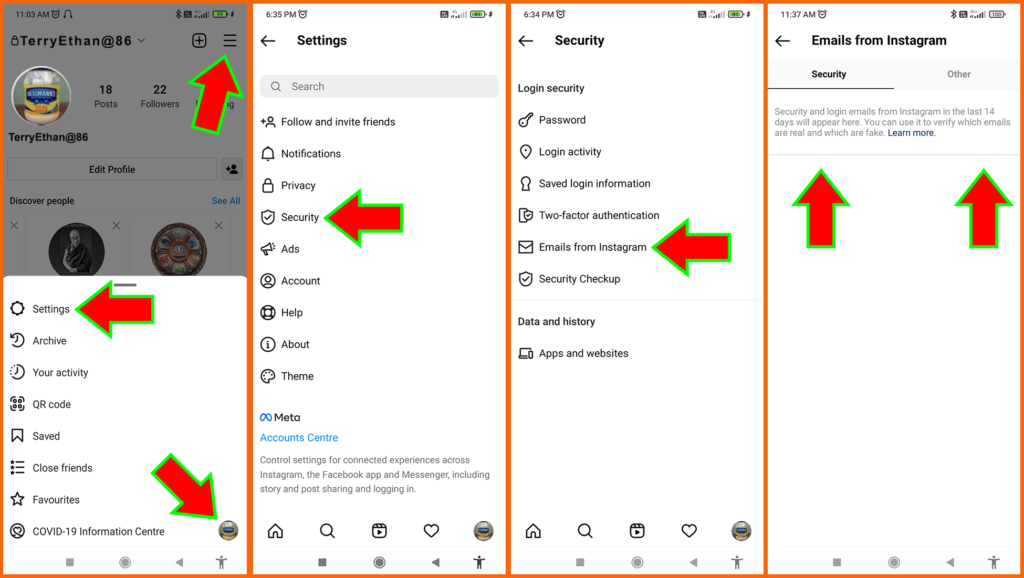
To fight against phishing and help users differentiate between fake emails and official Instagram correspondence, Instagram rolled out an “Emails from Instagram” tab, which will allow anyone to check if an email claiming to be from Instagram is genuine or not.
The feature can be found via your Profile Page and tap the 3 line icon () > Settings > Security > Emails From Instagram. A “Security” tab will display a list of the emails from Instagram in the past 14 days on account security & login. A second tab, dubbed “other,” will show you any remaining emails Instagram sent to you over the same period.
Step 3. Check Login Activity
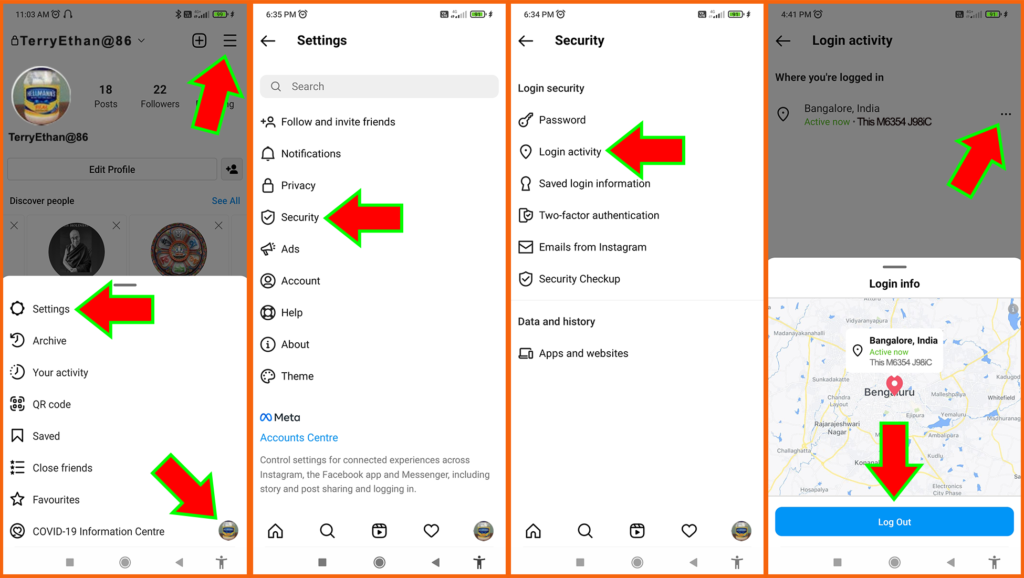
You can watch out for hackers by going to Profile Page and tap the 3 line icon () > Settings > Security >Login Activity. This page will show you a list of locations where you have logged in with your account. You can verify your current location and look through previous activity. If there are locations you don’t recognize, it’s a good idea to log out from those devices and change your password.
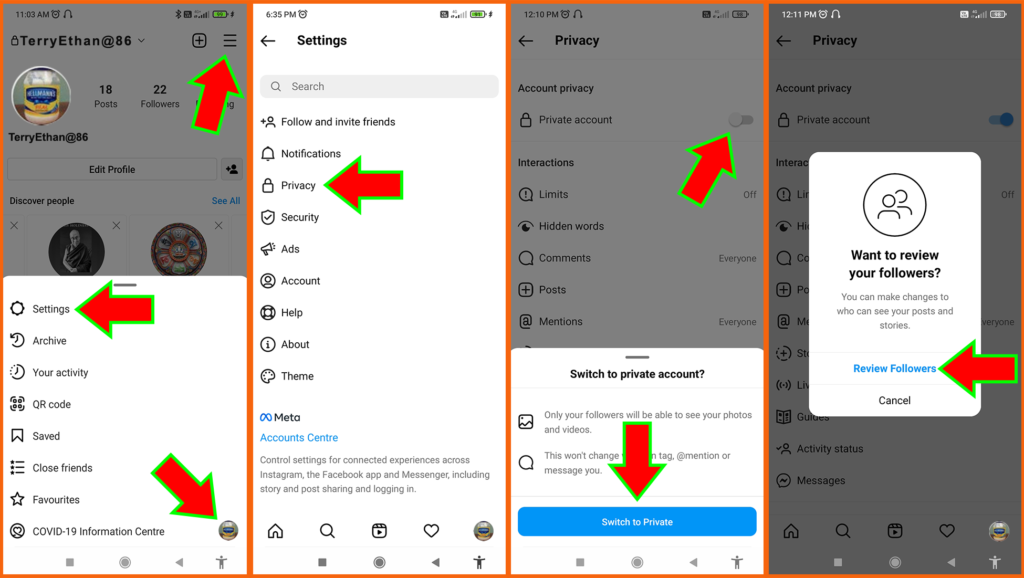
Step 4. Make Your Account Private
When you post to Instagram, anyone on the platform can see your pictures and videos by default. But when your account is private, Only approved followers will be able to find your posts through search, see which posts you’ve liked, and send you direct messages. New followers won’t be able to see your photos or videos without your approval first. With a private account, Google also won’t index any of your photos to Google Images. Set your account to private as shown below : Your Profile Page > 3-Line () >Settings > Privacy > and toggle on Private Account > Switch to Private > Now account is private and here you can also either Review Followers or Cancel it.
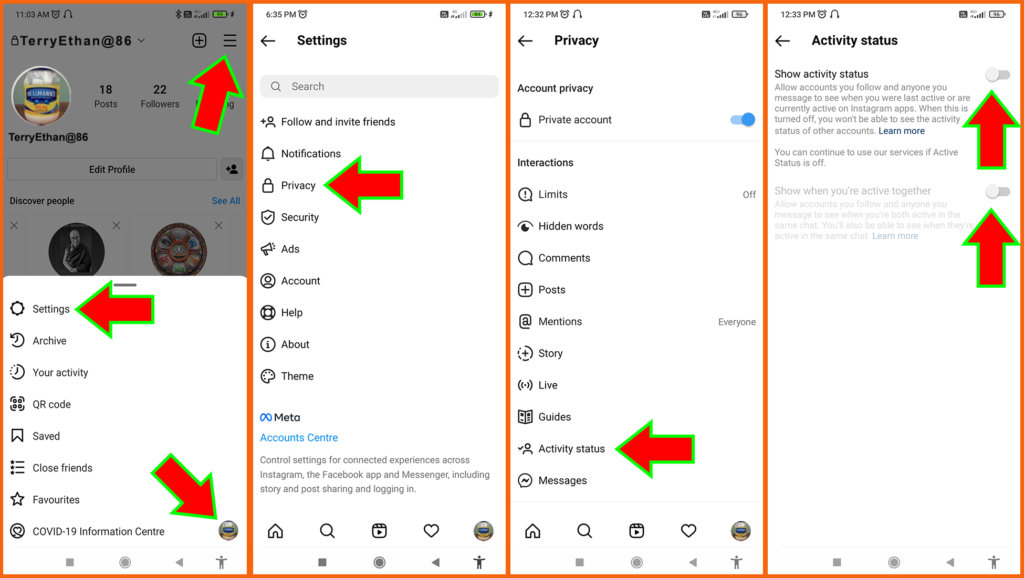
Step 5. Disable Activity Status
Instagram has a feature allowing people to see when you are actively using the app; just look for a little green dot next to a friend’s picture in your direct messages. It’s there to tell people when you are online to answer a direct message, but it can be a little intrusive when you just want to be left alone. Turn it off via Your Profile Page > 3-Line () >Settings > Privacy > Activity Status > toggle the option off for Show Activity Status.
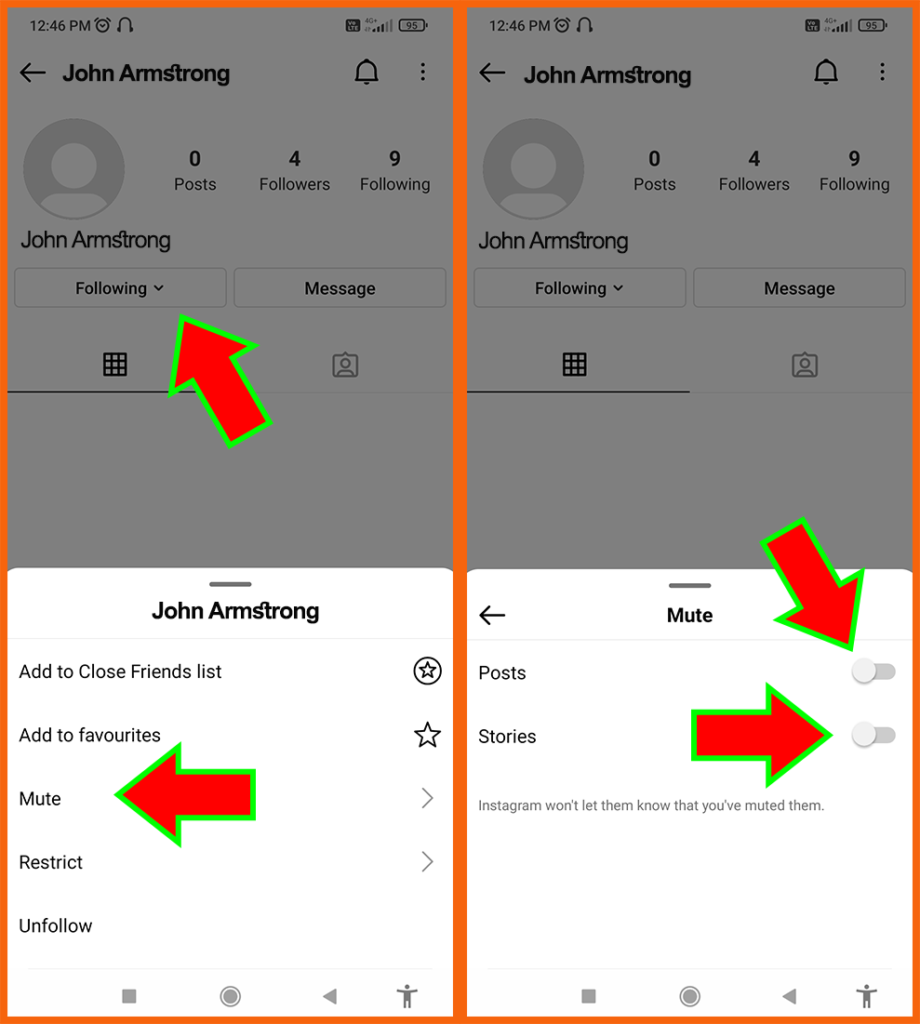
Step 6. Mute Account
You can mute a user, you will remain friends with them but stop seeing their updates in your feed. Instagram will not notify users that you’ve muted them. Go to the selected User’s account’s Profile Page > Following > Mute > Post or Stories or both.
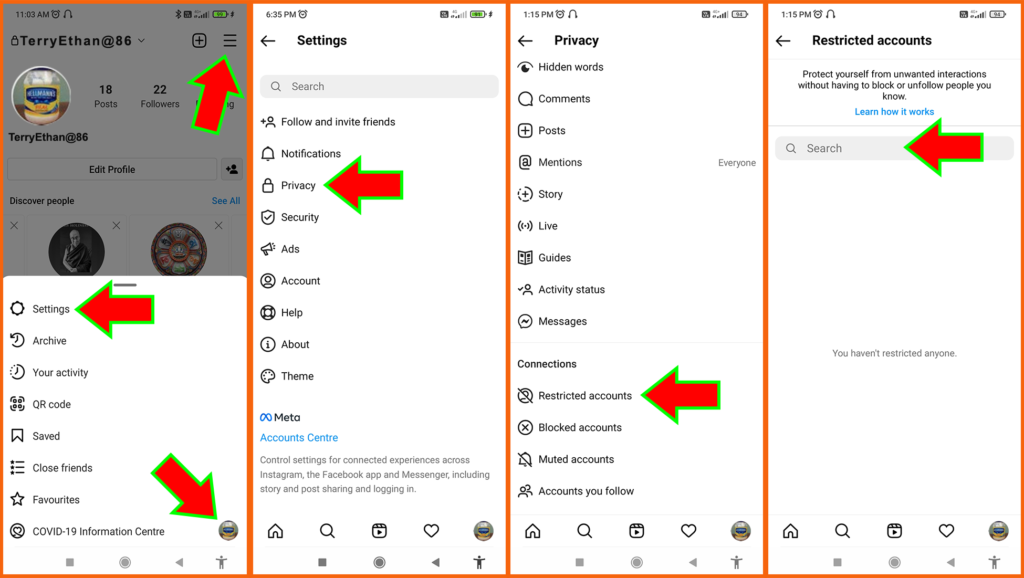
Step 7. Restrict Account
Instagram has introduced a new feature called Restrict that hides a particular user’s comments and notifications without unfollowing or reporting them.
To enable the feature, go to Profile Page > 3-Line icon () > Settings > Privacy > Restricted Accounts and add account’s name manually in the search bar and Click Restrict > Restrict Account. Or go to the selected user’s profile, tap Following below the profile icon and select Restrict. Once Restrict is enabled, comments on your posts from restricted users will only be visible to that person. You can view the comment by tapping “See Comment,” then choose to approve it, delete it, or ignore it. You won’t receive any notifications for comments from a restricted account.
Step 8. Report Account
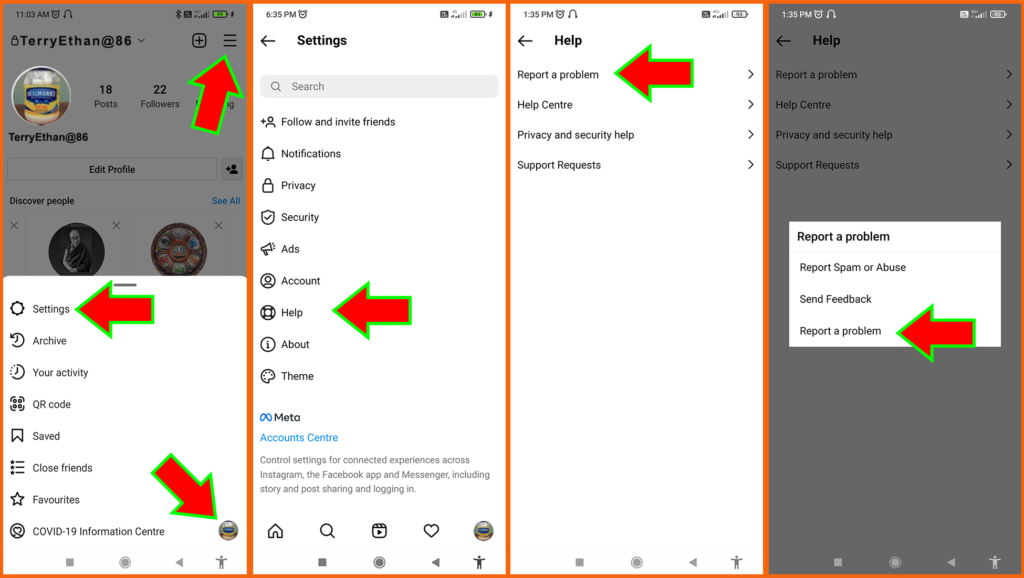
If someone is posting inappropriate content, You can report them to Instagram. Go to the account’s profile page icon > 3-Line icon > Settings > Help > Report a problem > Report a problem, or To report a specific comment, long-press on it and tap the exclamation point icon > Report this comment. You can report on Instagram’s website as well.
Step 9. Block Account
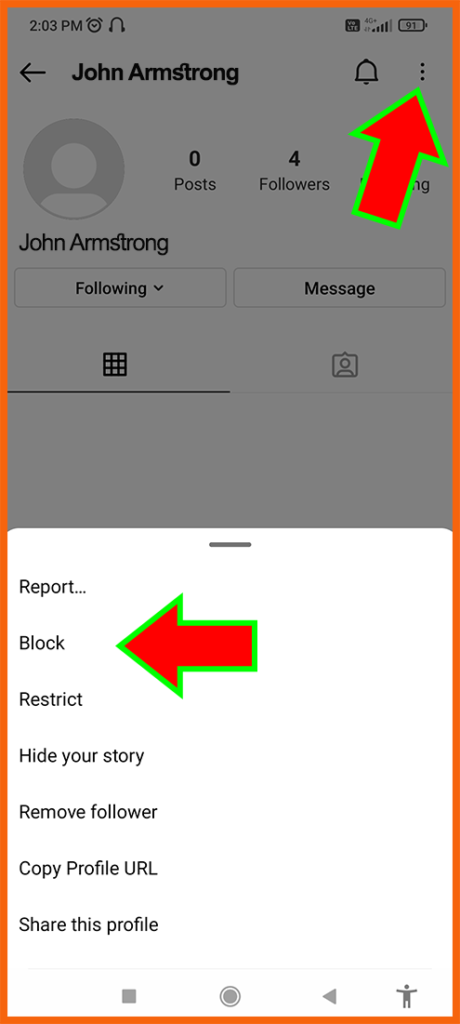
By reporting an account, Instagram automatically blocks the user for you. However, you can also manually block the account by opening the selected User’s account, then tapping the three-dot menu on the account in question and selecting Block.
Step 10. Remove Follower
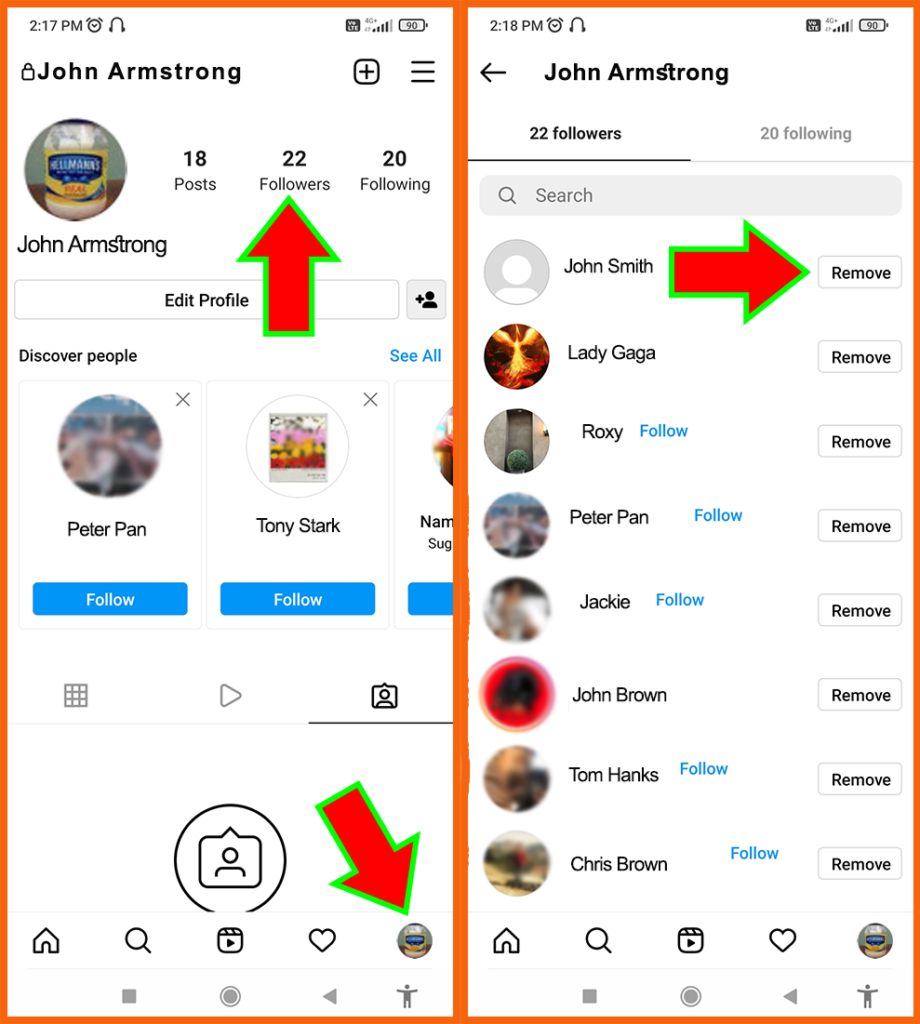
If blocking, muting, or restricting a follower all fail, use the nuclear option: remove them. Go to your Profile Page > tap Followers > find who you want to remove & tap Remove. This is a helpful feature for when you want to turn your account private and need to remove some followers.
Step 11. Control Comments and Stories
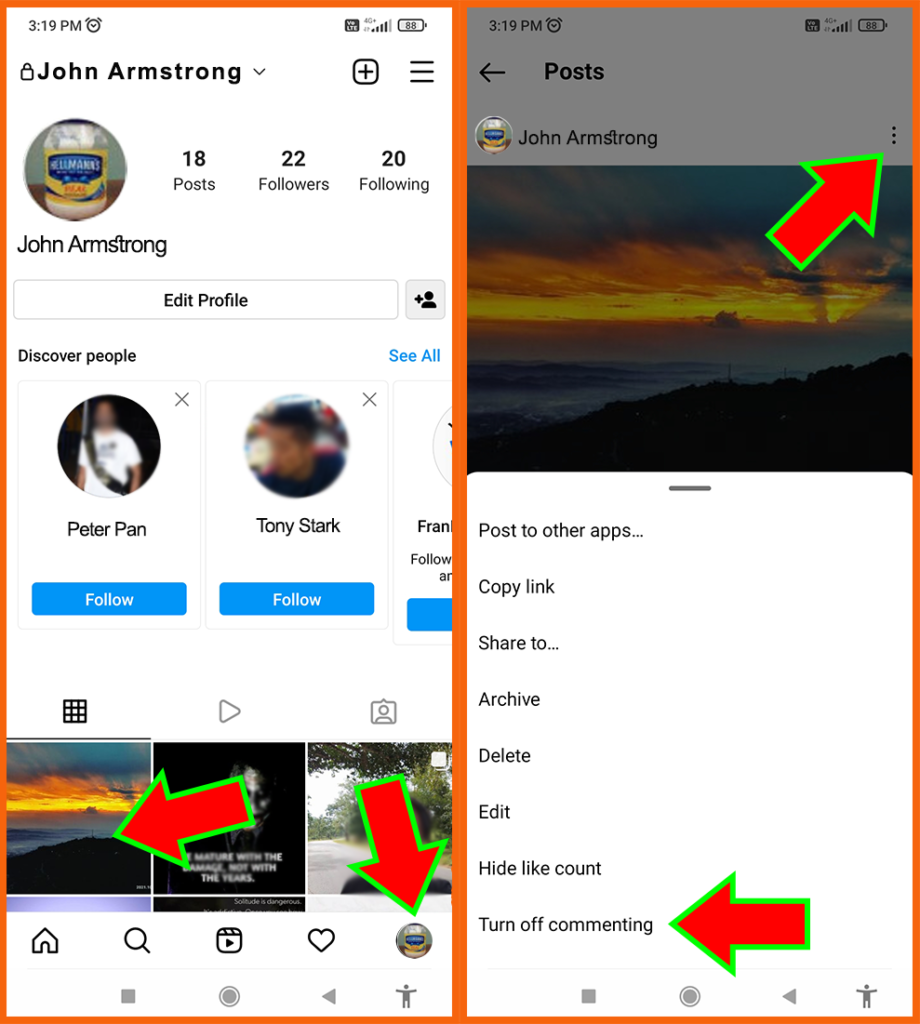
Instagram gives you full control over who can and cannot interact with your photos and videos. Go to Profile Page > select a Post > tap the three-dot icon in the top right-hand corner of your post and tap Turn Off Commenting.
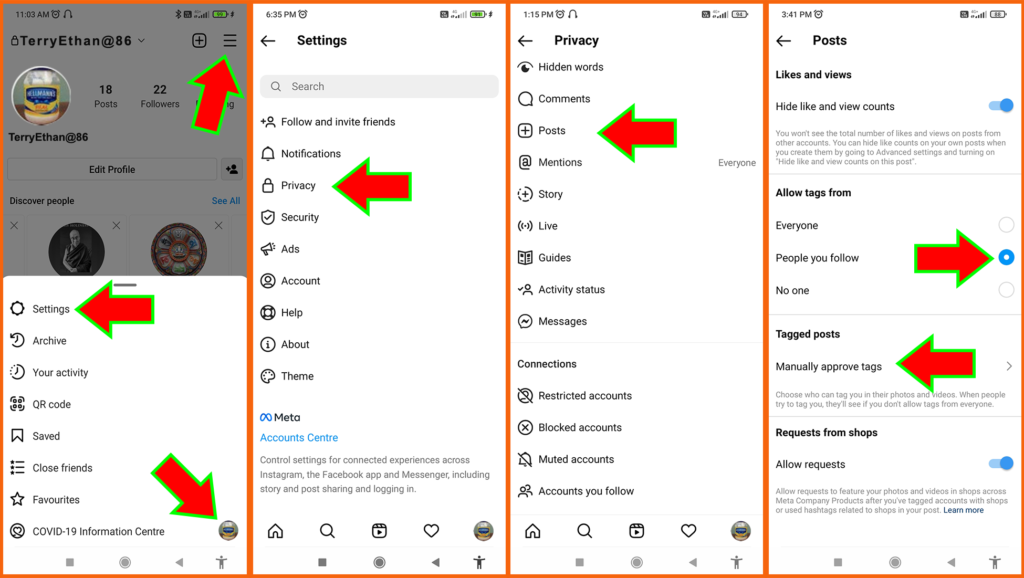
Step 12. Manage Tagged Photos
Anyone can tag you in a photo, but you can remove yourself from these posts or adjust your settings to approve tagged images before they appear on your profile.
Go to Profile Page > 3-Line icon > Settings> Privacy > Posts > Allow tags from > Now select who can tag you.
Go to Profile Page > 3-Line icon > Settings> Privacy > Posts > Manually approve tags > Now choose whether to approve or not.
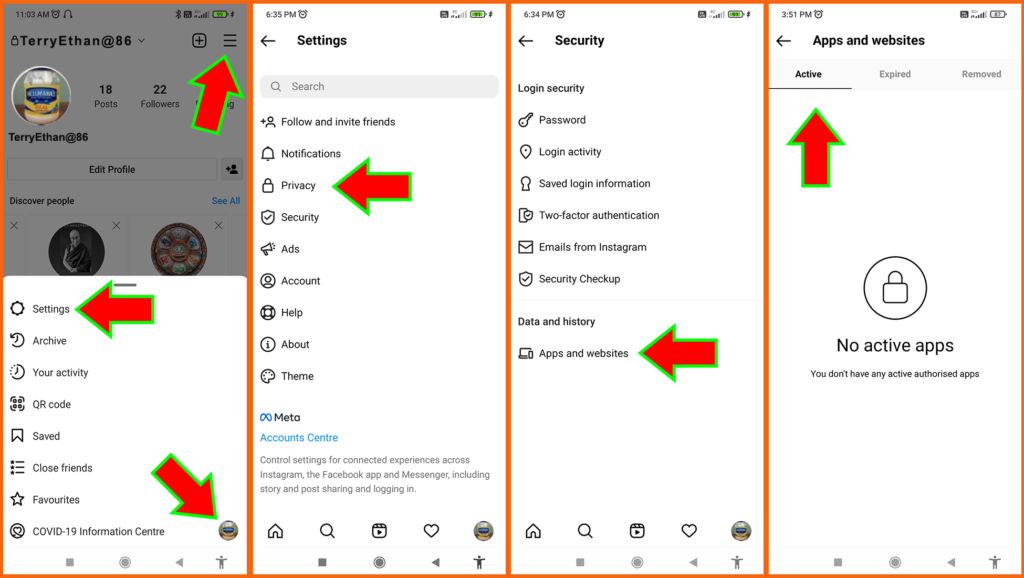
Step 13. Revoke Access to Third-Party Apps
Many third-party apps connect to Instagram to provide additional functionality across the web, but it’s easy to lose track of how many apps you’ve connected to your account. Keep tabs on these connections via Profile Page > 3-Line > Settings > Security > Apps and Websites, where you can view Active and Expired authorized apps, then Removed or grant access to the services you want.
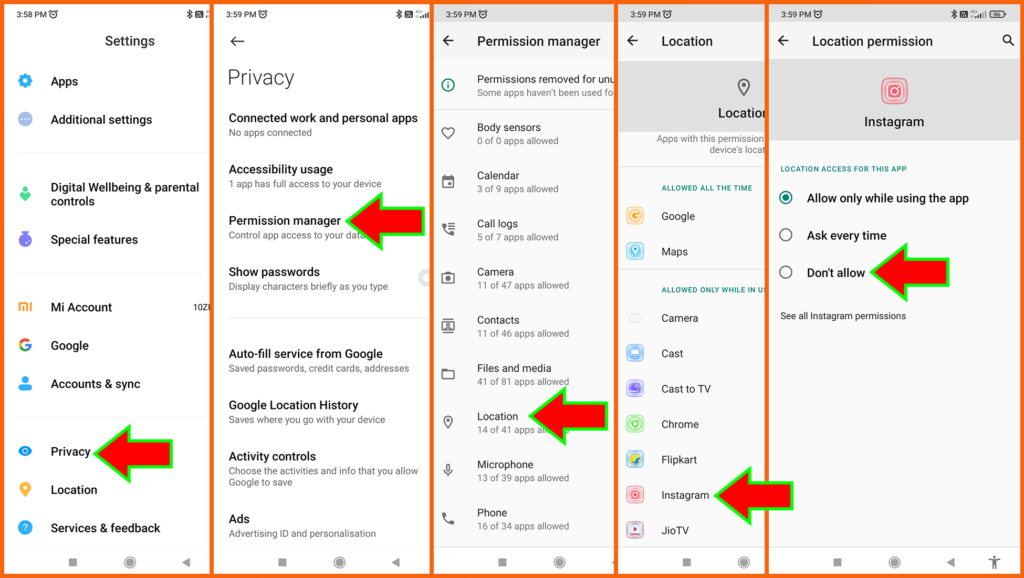
Step 14. Don’t share your locations
An important step you can take to keep yourself secure from identity theft and hide your account’s credentials from online criminals, is to make sure your location services for Instagram are turned off. You can turn off your Location Services for Instagram through your Phone’s “settings” > “Privacy” > “Permission Manager” > “Location” > Select “Instagram”, and then Check Box “Don’t allow”.
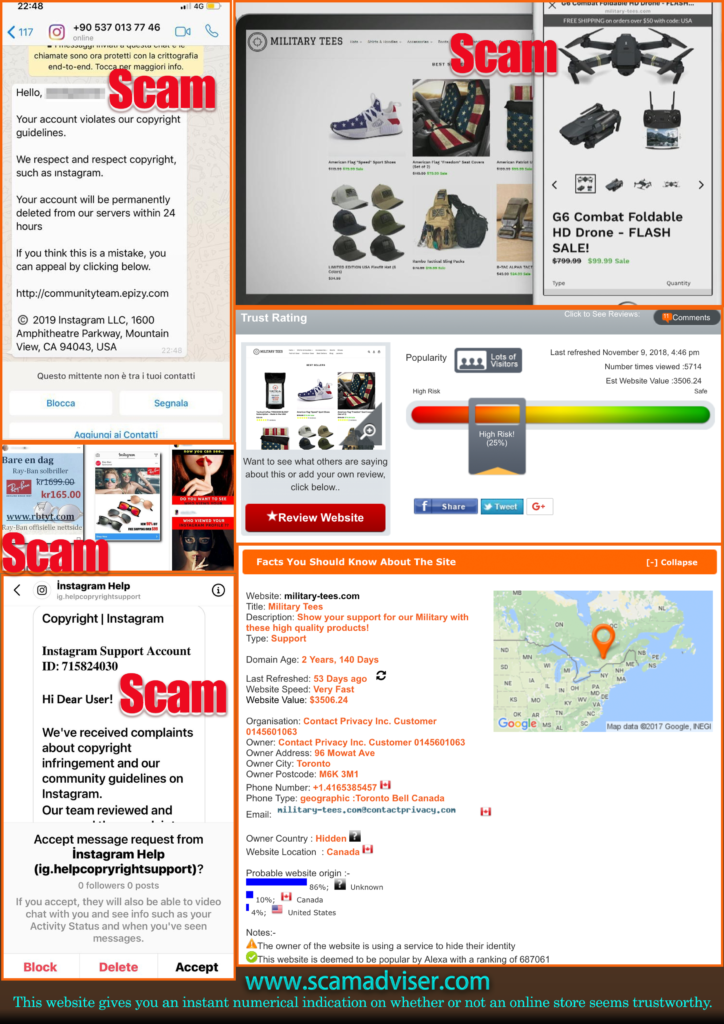
Step 15. Don’t click random links or Ads
As mentioned above, don’t click random links received through chat messages, always confirm first with the sender through other social media platforms or contact them through other real contact details like email to confirm legitimacy and never reply on the same link they share. Also don’t click random ads marketed in your Instagram page. Always visit the parent website of ads and confirm its legitimacy. Anyone can pretend to be you or create an infected link posing as genuine. Don’t be tempted by heavily discounted high-end products. The biggest red flag is a price that is dramatically lower than that of other sellers. Google the URL/brand, check the website & read Facebook and YouTube reviews.
Additionally, you can check if the website is trusted or not by using www.scamadviser.com. This website gives you an instant numerical indication on whether or not an online store seems trustworthy. For more information on “Think before you Click”, read from the link.
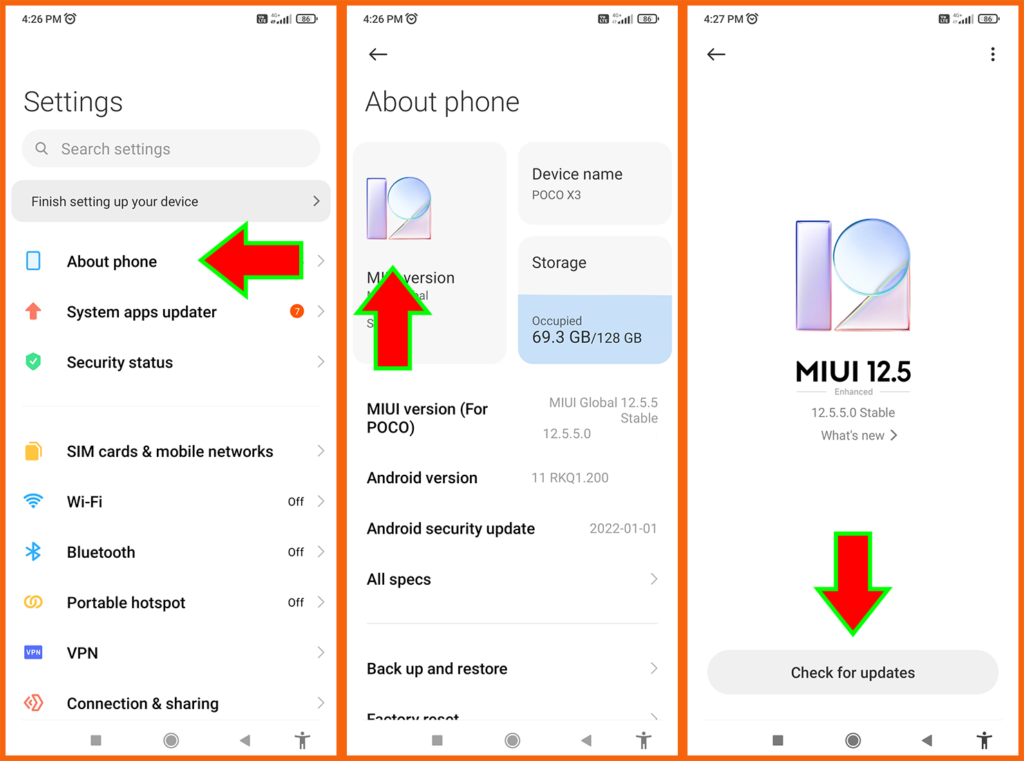
Step 16. Always Update your Device OS
Make sure that you always and always update your device’s OS. No matter how secure you set your social media accounts, if your phone’s OS is not updated. Then there will be vulnerabilities and through which your whole device and social media accounts will be compromised. So better be safe than sorry.
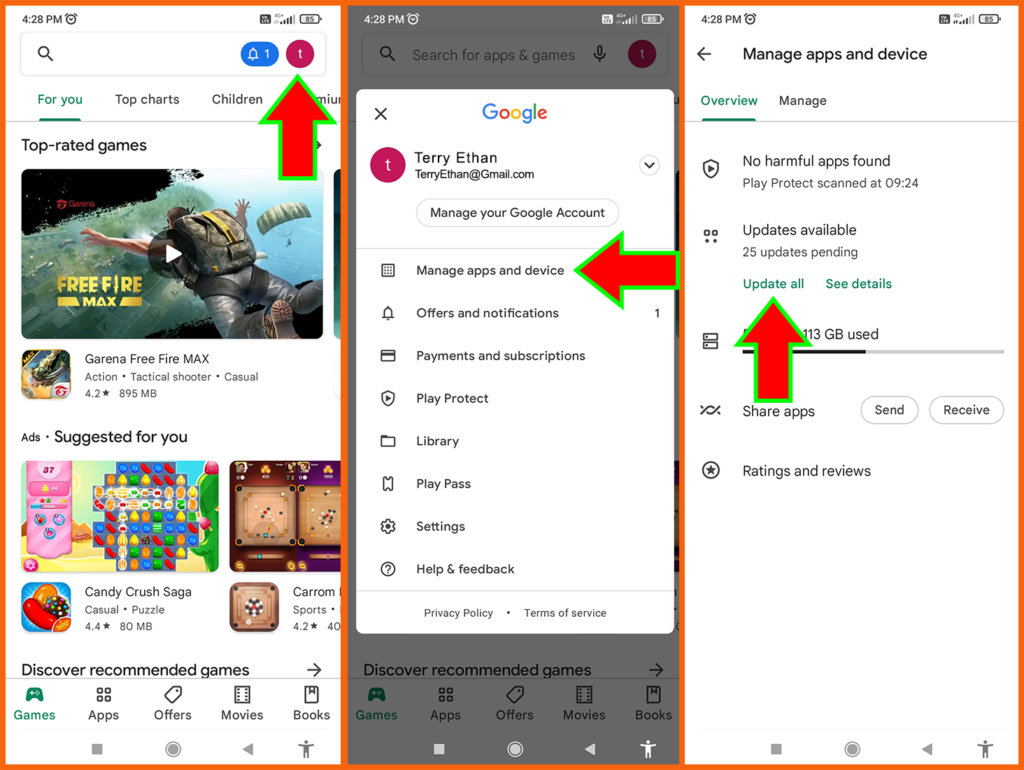
Step 17. Always Update all the application on your Device
While updating your phone’s OS, don’t forget to update each and every individual app on your phone from the respective store. Just like above, if you don’t update your applications on the phone, then there will be vulnerabilities. Through these vulnerabilities, your whole device and social media accounts will be compromised.
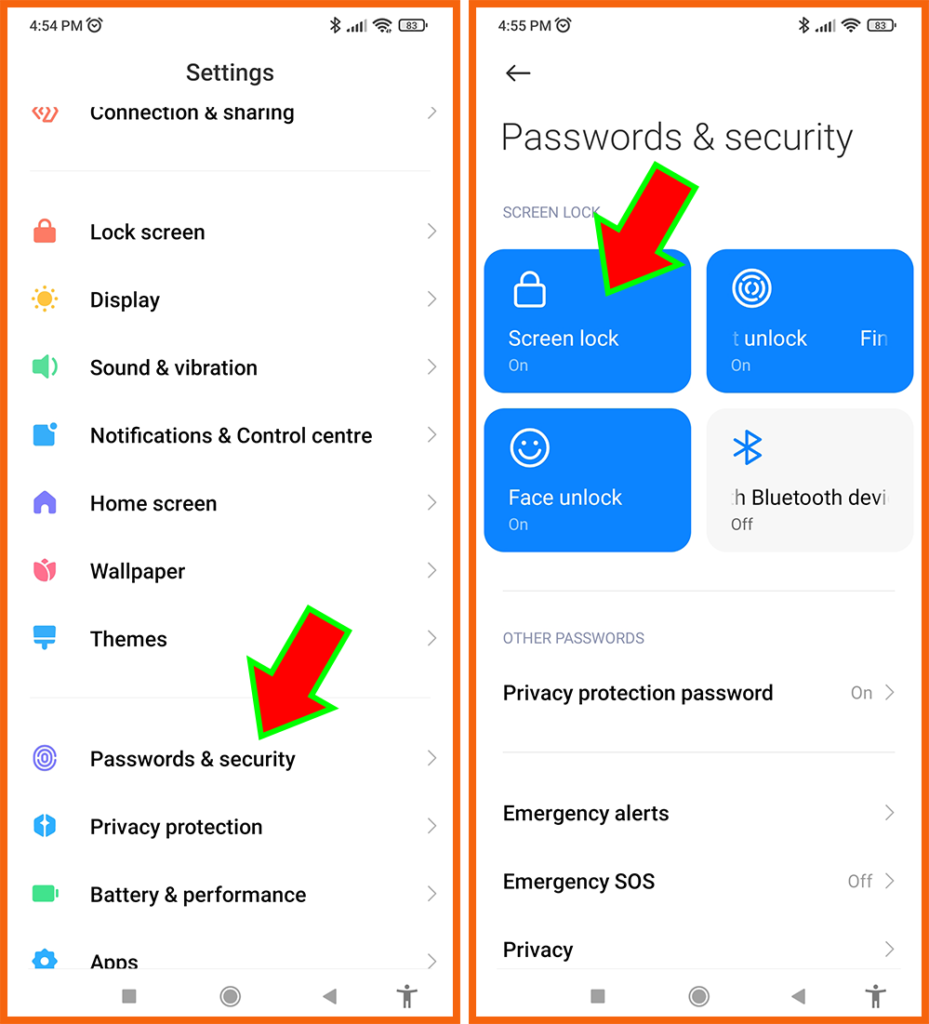
Step 18. Set Screen locked
From the phone setting, set up the lock screen. If possible set up using a password. While not using the phone, make sure you lock the phone. So even if someone else gets your phone through lost or misplaced. They won’t be able to misuse it. This can mitigate the damage and save you trouble.
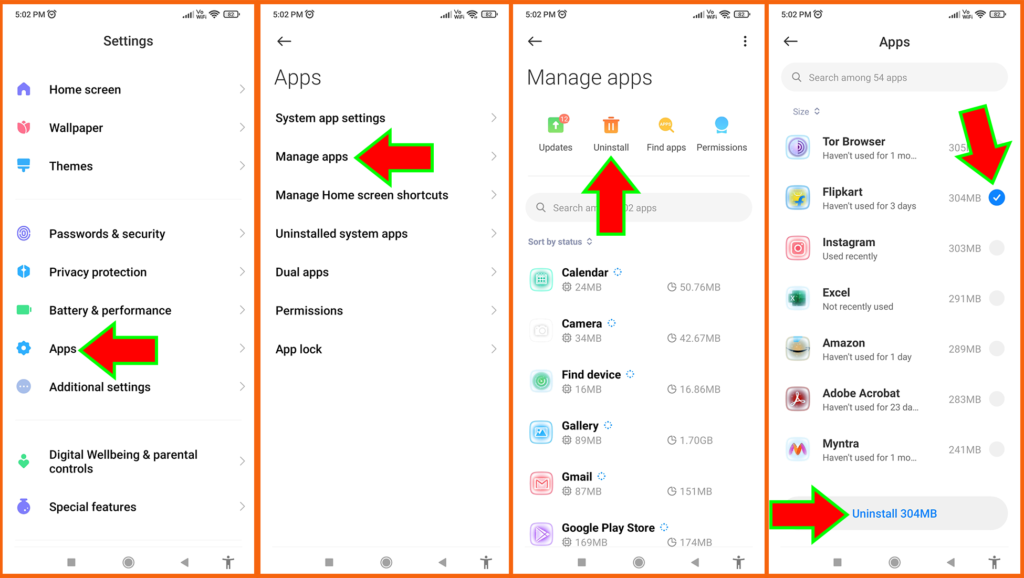
Step 19. Uninstall not use apps
Don’t be hoarder. Don’t download and keep all the apps you find interesting. The more apps you have on your phone, the more vulnerabilities it will present. Basically each app will have their own vulnerabilities. So uninstall the apps you don’t use and keep only those that you use regularly and known to be safe based on review and application owner’s history.
Disclaimer: At the end of day, no system is completely safe from human error. When that happens, all hell will break loose. Jokes aside, above mentioned tips can’t guarantee you hundred percent safety but it can help you guide in the right direction.
0 Comments