
How to Install and set up OS using bootable flash drives.
Installing Window OS:
In this article, you will read a detailed tutorial on how to install Windows 10 using USB Flash Drive and DVD on your PC or laptop along with suitable screenshots which will make it easier to install Windows 10.
The process of installing Windows 10 using DVD and USB is very similar. The only reason why users prefer to install Windows 10 using USB drive in comparison of traditional DVD method is speed.
In case, you have never done this before, then you can follow the instructions in upcoming lines to install Windows 10.
Things to keep in Mind
- If you’re installing Windows 10 for the first time, then it is highly recommended to check whether your computer or laptop compatible with the operating system or not. Like optimum disk space and RAM.
- Create a backup of all your personal data which is stored in the C Drive because during the installing of Windows 10, you will lose all the data lying in the C Drive.
Requirement
- You require Windows 10 ISO file. Download it from Microsoft Official website.
- Bootable USB Drive, if you want to install Windows 10 using USB Drive (Follow this guide to create Windows 10 USB Drive)
- Bootable DVD Drive, if you want to install Windows 10 using DVD Drive. (Follow this guide to create Windows 10 DVD Drive)
Steps to Install Windows 10
1. Insert bootable Windows 10 DVD or USB Drive and restart your computer.
2. If your DVD or USB is bootable, then your computer will automatically boot from bootable Windows 10 USB or DVD.
In case, it is not a bootable installation media, then you need to visit BIOS and their make appropriate changes to boot from USB or DVD.
Alternatively, When you see the black screen after reboot, press ESC or F12 key for bringing boot selection menu. Boot key varies from ESC to F1, F2, F8, F10, F11, F12 and Del key and depends on PC/Motherboard manufacturers.
Once you get the boot menu, select the installation media drive and hit Enter.
3. Once your system successfully boots from your desired Windows 10 installation media, you will see different options and you need to select according to your requirements
- Language to install
- Time and Currency Format
- Keyboard or Input method
After selecting all the details, click on the “Next” button.

4. In the next window, you will see a blue color window with a button labeled as “Install Now“. You need to click on it to continue the setup.

5. In this window, you will be asked to enter the 25 character product key in the space provided and then click on the Next button.

If you don’t have a product key for the moment, then you can also click on Skip button and enter the product key later.
Note: In above step, if you enter the product key, then you will not see the additional window where you can select the edition which you want to install on your computer.

6. Now you will see the license agreement window, if you want, you can read all the terms and conditions, check the option labeled as “I accept the license terms” and hit the “Next” button.

7. In the next window, you will see two different options:
- Upgrade: Install Windows and keep files, settings, and applications
- Custom: Install Windows Only (Advanced)
To perform a clean installation of Windows 10, you need to click on the second option i.e. Custom: Install Windows Only (Advanced).

8. In the next windows, you need to choose the drive on which you want to install the copy of Windows 10. If the drive already running a copy of Windows and you want to remove it, then you need to format the system drive where the window is already installed. Of course, this will free up space drive space.
To format the system drive, you need to select the drive and click on the “format” option at the bottom of the window.

In case, you have installed the new SSD (Solid State Drive) and Hard Drive and you have not created any partition yet, then you will see unallocated space depending on the size on the drive.
To create a partition, you need to select the drive and click on “New” button. Make sure to allocate a minimum of 20 GB or you can create a partition of more size depending on the space on your hard drive. Click “Apply” to complete the process.

The system will additionally create a partition with name “System Reserved” to ensure that system work fine. The size of this partition is around 100MB in most of the cases.

Note: After formatting the drive, you will lose all the data on the C drive and settings which include installed apps, games, and any personal data lying on the desktop, Music, Video, Pictures and related folders.
9. Select the drive where you want to install the copy of Windows 10 and click on the “Next” button.
At this point, the installation of Windows will start. It will take around 20-25 minutes to complete the installation process.

During the installation, your system may reboot two or three times.
Note: At the time or reboot, make sure to unplug the USB drive or DVD drive otherwise it will load the complete setup again. Or if your Flash drive is bootable then don’t press Any key on your keyboard.
10. Once the installation is completed. You will see the blue color screen.
Here you can click on “Use Custom Settings” button if you want to go with default settings. You can also click on “Customize” button if you want to customize settings.

Keep following the instruction as mentioned on the screen and in few seconds Windows 10 home screen will appear.

That’s it! This is how you can install Windows 10 using USB or DVD Drive
If you have not entered the 25 character windows key above,
then go to settings -> Update & security -> Activation. Here you need to enter the key to activate the windows.

During the process, if you face any issue let us know in the comments. We would love to assist you!
Installing Ubuntu OS:
Step-by-Step Guide to Install Ubuntu 18.04 LTS on your Laptop or Desktop
Step 1) Download Ubuntu 18.04 LTS ISO File
Please make sure you have the latest version of Ubuntu 18.04 LTS, If not, please download the ISO file from the link here
https://www.ubuntu.com/download/desktop
Since Ubuntu 18.04 LTS only comes in a 64-bit edition, so you can install it on a system that supports 64-bit architecture.
Step 2) Create a Bootable Disk
Once the ISO file is downloaded then next step is to burn the downloaded ISO image into the USB/DVD or flash drive to boot the computer from that drive.
Also make sure you change the boot sequence so that system boots using the bootable CD/DVD or flash drive.
Read More on “How to Create Bootable USB Disk / DVD on Ubuntu / Linux Mint”
Step 3) Boot from USB/DVD or Flash Drive
Once the system is booted using the bootable disk, you can see the following screen presented before you with options including “Try Ubuntu” and “Install Ubuntu” as shown in the image below,


Even though when you click “Try Ubuntu” you can have a sneak peek into the 18.04 LTS without installing it in your system, our goal here is to install Ubuntu 18.04 LTS in your system. So click “Install Ubuntu” to continue with the installation process.
Step 4) Choose your Keyboard layout
Choose your favorite keyboard layout and click “Continue”. By default English (US) keyboard is selected and if you want to change, you can change here and click “Continue”,

Step 5) Preparing to Install Ubuntu and other Software
In the next screen, you’ll be provided following beneath options including:
- Type of Installation: Normal Installation or Minimal installation, If you want a minimal installation then select second option otherwise go for the Normal Installation. In my case I am doing Normal Installation
- Download Updates While Installing Ubuntu (select this option if your system has internet connectivity during installation)
- Install third party software for graphics and Wi-Fi hardware, MP3 and additional media formats Select this option if your system has internet connectivity)

click on “Continue” to proceed with installation
Step 6) Select the appropriate Installation Type
Next the installer presents you with the following installation options including:
- Erase Disk and Install Ubuntu
- Encrypt the new Ubuntu installation for security
- Use LVM with the new Ubuntu installation
- Something Else
Where,
Erase Disk and Install Ubuntu – Choose this option if your system is going to have only Ubuntu and erasing anything other than that is not a problem. This ensures a fresh copy of Ubuntu 18.04 LTS is installed in your system.
Encrypt the new Ubuntu installation for security – Choose this option if you are looking for extended security for your disks as your disks will be completely encrypted. If you are beginner, then it is better not to worry about this option.
Use LVM with the new Ubuntu installation – Choose this option if you want to use LVM based file systems.
Something Else – Choose this option if you are advanced user and you want to manually create your own partitions and want to install Ubuntu along with existing OS (May be Windows or other Linux Flavor)
In this article, we will be creating our custom partitions on a hard disk of 40 GB and the following partitions are to be created:
- /boot 1 GB (ext4 files system)
- /home 18 GB (ext4 file system)
- / 12 GB (ext4 file system)
- /var 6 GB (ext4 file system)
- Swap 2 GB

Now, Choose “Something Else” and Click on continue
You can see the available disk size for Ubuntu in the next window as shown below:
Now in order to create your own partitions, click on “New Partition Table”


Click on Continue
Create /boot partition of size 1GB, Select the free space and then Click on the “+” symbol to create a new partition

Click on “OK”
Let’s create /home partition of size 18 GB,

In the same way create / & /var file system of size 12 GB & 6 GB respectively


Now create last partition as swap of size 2 GB,

Click on OK
Once you are done with the partition creation task , then click on “Install Now” option to proceed with the installation


Now click on “Continue” to write all the changes to the disks
Step 7) Select Your Time zone
Choose your favorite time zone and then click on “Continue”

Step 8) Provide your User Credentials
In the next screen you will be prompted to provide your user credentials. In this screen provide your name, computer name, username and the password to login into Ubuntu 18.04 LTS

Click “Continue” to begin the installation process.
Step 9) Start Installing Ubuntu 18.04 LTS
The installation of Ubuntu 18.04 LTS starts now and will take around 5-10 mins depending on the speed of your computer,

Step 10) Restart Your System
Once the installation is completed, remove the USB/DVD from the drive and Click “Restart Now” to restart your system.

Read More on : How to Install VirtualBox 6.0 on Ubuntu 18.04 LTS / 18.10 / CentOS 7
Step:11) Login to Your Ubuntu 18.04 desktop
Once your system has been rebooted after the installation then you will get the beneath login screen, enter the User name and password that you have set during installation (Step 8)


And that concludes our step by step installation guide for Ubuntu 18.04 LTS and it’s all up to you now to explore the exciting features of Ubuntu 18.04 LTS and have fun 🙂
Installing Mac OS:
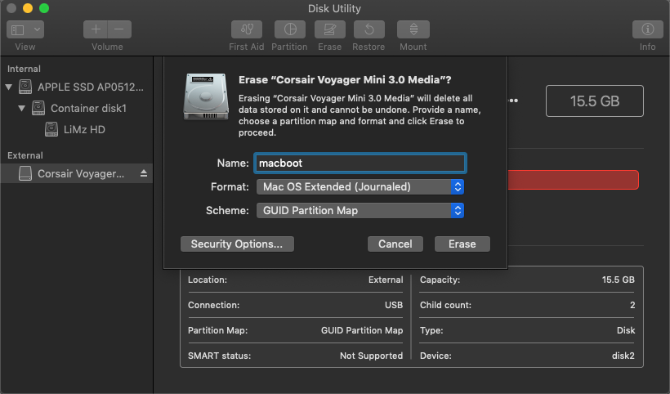
Formatting Your USB Flash Drive
You can only create a bootable installer for macOS on a Mac. If you’re using a flash drive that already has data on it, make sure to back up any important files as you’re going to erase everything in a moment.
Open Finder. Navigate to Applications > Utilities, and open up Disk Utility. You should see your flash drive under the External section in the left pane. After selecting it, click on the Erase button along the top.
Choose a friendly name (which you’ll use later), and make sure to choose Mac OS Extended (Journaled) for the format. Finally, click Erase and you’re done with this step.
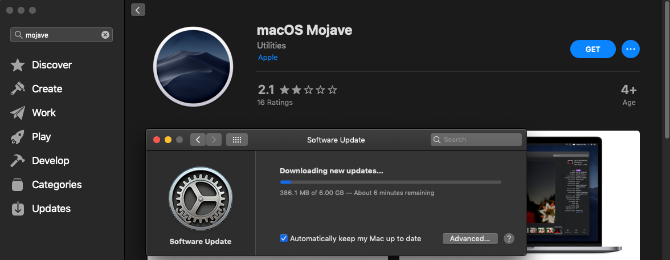
Downloading the macOS Installer
To download the macOS installer, open the App Store and search for your version of macOS. Click on the Download button if you’re on High Sierra or earlier.
macOS Mojave is slightly different, as it opens up your System Preferences to download the installer. This is because one of the changes in Mojave is a new way of installing updates.
In either case, once the installer opens, quit it without continuing the installation.
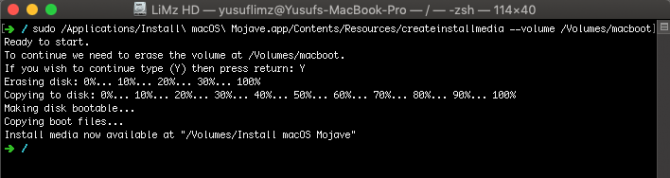
Creating a Bootable USB Using Terminal
Terminal is the easiest way to create your bootable USB drive. Just replace the MyVolume portion of the command with the name you gave your drive in the Disk Utility step above.
Take note that the commands differ slightly for creating Mojave and High Sierra installers on older versions of macOS.
Mojave installer on Mojave or High Sierra:
sudo /Applications/Install\ macOS\ Mojave.app/Contents/Resources/createinstallmedia --volume /Volumes/MyVolumeMojave installer on Sierra or earlier:
sudo /Applications/Install\ macOS\ Mojave.app/Contents/Resources/createinstallmedia --volume /Volumes/MyVolume --applicationpath /Applications/Install\ macOS\ Mojave.appHigh Sierra installer on High Sierra:
sudo /Applications/Install\ macOS\ High\ Sierra.app/Contents/Resources/createinstallmedia --volume /Volumes/MyVolumeHigh Sierra installer on Sierra or earlier:
sudo /Applications/Install\ macOS\ High\ Sierra.app/Contents/Resources/createinstallmedia --volume /Volumes/MyVolume --applicationpath /Applications/Install\ macOS\ High\ Sierra.appSierra:
sudo /Applications/Install\ macOS\ Sierra.app/Contents/Resources/createinstallmedia --volume /Volumes/MyVolume --applicationpath /Applications/Install\ macOS\ Sierra.appEl Capitan:
sudo /Applications/Install\ OS\ X\ El\ Capitan.app/Contents/Resources/createinstallmedia --volume /Volumes/MyVolume --applicationpath /Applications/Install\ OS\ X\ El\ Capitan.appCopy and paste the command you need above into your Terminal window and press the Return key. After entering your password, confirm you want to erase the USB drive by typing Y followed by Return.
Terminal will now erase and create your bootable USB drive, ready for you to boot from.
Step 1 : How to Install macOS High Sierra
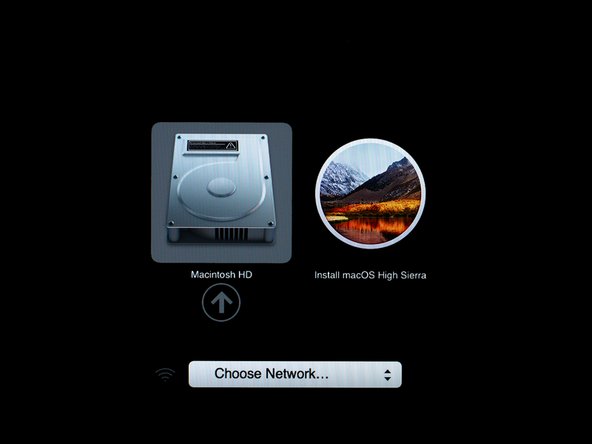

- With the device powered off, disconnect any external hard drives and flash drives.
- Plug in your macOS High Sierra bootable flash drive.
- Hold down the [option] or [alt] (⌥) key on the keyboard and power on the device.
- When you see the boot selection screen as shown above, release the [option] key.
- Use either the keyboard’s arrow keys or the mouse to select “Install MacOS High Sierra.” Press [enter] or click your selection with the mouse.
Step 2:


- Your Mac will begin copying the installation files from the flash drive. This may take up to 30 minutes.
- Depending on the speed of your flash drive, it may look like progress has frozen, but it should resume if you continue to wait.
- When prompted, select your language and press [enter], or click the arrow button
Step 3 :

- If you don’t need to pre-configure your hard drive, skip to step 5. If you’re not sure or if the drive is used, it’s a good idea to pre-configure your hard drive.
- Select “Disk Utility” from the menu and press [enter] or click the continue button.
Step 4
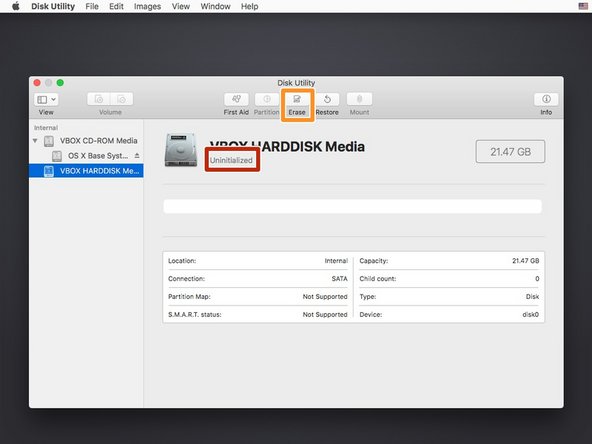


- Select your hard drive from the left column in Disk Utility.
- It is most likely the uninitialized drive.
- If you have multiple hard drives, make sure you select the correct one as the next step will wipe the selected drive clean.
- Click the “Erase” button at the top of the window.
- Choose a name for your drive (you can rename it later). Leave the format as Mac OS Extended (journaled), and the scheme as GUID Partition Map.
- Click “Erase.”
- When the process completes, click “Done.”
- Exit the Disk Utility by clicking on the red X button on the top left corner of the window.
Step 5:
![Select "Reinstall macOS" from the menu and press [enter] or click "Continue."](https://d3nevzfk7ii3be.cloudfront.net/igi/ohHxW1xIOC3CmnCm.medium)
- Select “Reinstall macOS” from the menu and press [enter] or click “Continue.”
Step 6:


- Read through the license agreement.
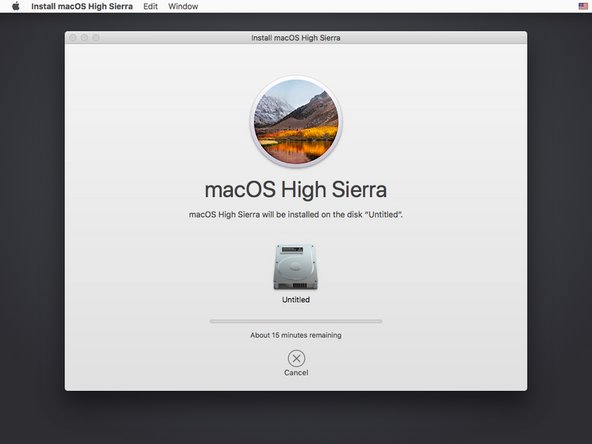
- Click “Agree” to accept the license agreement.
- Your Mac will now install macOS High Sierra. Be patient and wait for it to complete.
- Once the install is complete, the device will restart itself.

0 Comments